Thursday, August 25, 2016

Discovering Friendships: Fruit of the Spirit Bracelets for Kindergarten

Discovering Friendships: Fruit of the Spirit bracelets
“Patterns in God’s World”
Lesson Plan for Kindergarten
Prepared by Ms. Yandell

OVERVIEW & PURPOSE

Introduce STEAM to our kindergartners by discovering patterns and learn about God’s love while making friendship bracelets.  We will explore the importance of discovering friendships, so the students can learn more about their community here at CCS.   

EDUCATION STANDARDS

  1. 21st Century communication skills
  2. 21st Century collaboration skills

OBJECTIVES

  1. Discovering new friendships
  2. Discovering our school community
  3. Discovering God’s love and faithfulness through the Fruits of the Spirit
  4. Being respectful of our words and being good listeners
  5. Understanding the good of the team over their own viewpoint- how to compromise
  6. How to encourage others
  7. When you don’t do your part, it let’s the whole team down

MATERIALS NEEDED


  1. 1 pipe cleaner per child
  2. 9 color beads


VERIFICATION
After friendship bracelets are done recap with the following questions:
  • Did your team group together today?
  • Did you listen to each other?
  • Were your ideas listened to?
  • Did your discover new things about your classmates?
  • What are the Fruits of the Spirit?
  1. ACTIVITY

    Gather straws and cut them to be the size of beads.  Provide each child with a pipe cleaner to build their bracelet.  Separate the class into three to four groups, with four to five student.  In the center of each table, beads and straws will be arranged in color categories.  Gathering around the table, each child will take turns and pick out one bead at a time and answer a question that is designated to that specific color.  The students will all draw from one color group at a time and share their answer to the question with their group of friends.  Once they have collected all of the color beads and have shared about themselves with their friends, they will make a friendship bracelet that follows a color pattern for their class.  
    Colors Questions:
    Blue -  What is your favorite movie?
    Pink- What is your favorite animal?
    Orange- What is your favorite food?
    Green- What is your favorite ice cream?
    Yellow- What is your thing to do?
    White- What is your favorite game?
    Purple- What is your favorite color?
    Brown- What is your middle name?
    Red- What is your favorite book?

    Friendships Bracelet Class Pattern -  Repeat twice
    1. Pink- Love, Orange- Joy, White- Peace, Purple- Patience, Blue- Kindness, Brown- Goodness, Yellow- Faithfulness, Green- Gentleness, Red- Self Control

Recap by Julie Davis:


In kindergarten, our theme for the year is "I Can...Discover" with the lens of looking for patterns and order in God's world. Our kindergarten students are starting the year working on the themes of friendship, sharing about themselves, learning about the fruits of the spirit, and learning about patterns. This lesson integrated all these ideas into one exciting lesson with a take away to wear home. For me, it was exciting to see how this project reinforced the learning in the classroom. In the future, I think allowing the students to create a "class bead" and printing it on the 3D printer would be another fun option to further integrate STEAM into this lesson. Striving to improve a lesson is always important whenever I reflect on how things went. Stay tuned for more details on what next week's lesson entails!

Explorers of Coding: Fourth Grade

Explorers of Coding
“Exploration of Technology”
Lesson Plan for 4th Grade
Prepared by Ms. Yandell

OVERVIEW & PURPOSE

We are to be explorers of our society, to learn and create new things. This lesson aims to introduce the basic fundamentals of coding, which is creating a program that gives a computer specific instructions to do something.  We will explore the importance of coding and how technology is shaping our society.   

EDUCATION STANDARDS

  1. Next Generation Science Standards
  2. Common Core
  3. Integrated Math, English, Language Arts, & Science

OBJECTIVES

  1. Comprehension
  2. Problem Solving
  3. Creativity
  4. Planning out a series of instructions
  5. Write a program
  6. Test- see if your program works
  7. Debugging- find where you made a mistake in your program instruction and make, make changes as necessary!

MATERIALS NEEDED

  1. Ipad
  2. Light bot game

VERIFICATION

Steps to check for student understanding
  1. How would you explain, in words, how to move the Lightbot to the car?
  2. How did you come up with a solution to a new level, and what were the individual steps?
  3. If Lightbot did not do what you wanted, how did you find the mistake and fix it?
  4. Why is coding important and give some examples of real life things we are able to do use from computer programming? (music, art, games, apps, internet)
  5. If you were able to create a computer program what would it be?

ACTIVITY

Today, we are going to be playing a puzzle game called Lightbot. In Lightbot, there is a robot and he lives in a world of square tiles. The goal in each level is for Lightbot to light up all the blue tiles in the level. However, Lightbot does not understand something as complicated as saying “light all the blue tiles”. Instead, he does understand a basic set of rules. Display the following to students. An arrow icon tells Lightbot to move forward one space. A light bulb icon tells Lightbot to light up the tile he is standing on. You are all going to play Lightbot and try to beat the “Basics” level set.
**To begin we will play a short game of Simon Says.  I will give specific instructions that you must follow to be successful at the game! (3 mins)
**Go over the Lightbot instructions
1.To control Lightbot you need to give him a set of instructions, called a ‘program’, to run. 2.Once you press the green play button, Lightbot will perform all the instructions in the program one at a time.
3. If he makes a mistake, you will then have to tell Lightbot to go back to the start, and afterwards, change the program to give the correct instructions. Lightbot knows a few more instructions which will be introduced to you as you complete more levels.
(This lesson was adapted from lightbot.com)

Recap written by Jessica Yandell:
Last week, I had the opportunity to visit the fourth grade class to introduce them to coding.  The fourth grade thematic unit is focused around the age of exploration, which is why the lesson is called Explorers of Coding: The Exploration of Technology.  

I started the lesson by asking the students what they knew about coding, as well as,  name some things in our community that can be made from computer programming.  There were only a handful of students who knew how to explain what coding is.  I found it beneficial to explain the importance of why we must be explorers of technology, and asked the students how their life would be different without music, internet, games, etc.
The first part of introducing coding, I had the class play a quick game of Simon says, where I was Simon.  I wanted them to get the idea that to code a computer program, it takes specific instructions and you can not miss any steps.  Following the unplugged activity, each student participated in an hour of code using the Light Bot program on the Ipads.  During this time, the students were able to learn about the importance of sequencing, and following correct steps to accomplish a task.  This was a great time for the students to practice collaboration skills too; they were able to explain the correct sequence of steps to their friends that were having a harder time grasping the concept.  


Overall, this was a great activity to get students acquainted with coding and understanding the basics to programming a computer program.  Our next lesson will be introducing our new class friends, Dash & Dot smart robots!

Introducing Dash & Dot Coding to 3rd Grade


Introducing Dash & Dot: Unplugged 1 of 2
Lesson Plan for 3rd Grade
Prepared by Ms. Yandell

OVERVIEW & PURPOSE

The purpose of this lesson is to introduce the students to Dash & Dot smart robotics.  They will be introduced to programming and how it is used to make robots to certain functions.  This will be a two part lesson, the first being an unplugged experience.

EDUCATION STANDARDS

ISTE Standards (technology standards)
Creativity and Innovation - Students demonstrate creative thinking, construct knowledge, and develop innovative products and process using technology.
Critical thinking, problem solving and decision making - Students use critical thinking skills to plan and conduct research, manage projects, solve problems, and make informed decisions using appropriate digital tools and resources.
  • Use multiple processes and diverse perspectives to explore alternative solutions
Technology operations and concepts - Students demonstrate a sound understanding of technology concepts, systems and operations.
  • Understand and use technology systems
  • Select and use applications effectively and productively
  • Troubleshoot systems and applications
  • Transfer current knowledge to learning of new technologies

OBJECTIVES

  1. Comprehension
  2. Problem Solving
  3. Creativity
  4. Planning out a series of instructions
  5. What comes to mind when you hear the word robot?
  6. What is a robot?
  7. What is a computer program?
  8. Why do we use computer programs for Dash & Dot?
  9. What are things that robots can be programmed to do?
  10. What are things that robots can do to help our community?

MATERIALS NEEDED

  1. Dash & Dot
  2. 10 Ipads
  3. Pencil and Paper

VERIFICATION

Steps to check for student understanding
  1. After today’s lesson, will you all be ready to program the dash robots perform different functions?
  2. How does programming work?
  3. Were you able to work well in your group, and give proper instructions to your puppeteer?
  4. If things did not go well, what could you have done differently?

ACTIVITY

Unplugged activity - Puppeteer
First demonstrate this activity with you, the teacher, as the ‘puppet’ and the class giving instructions.
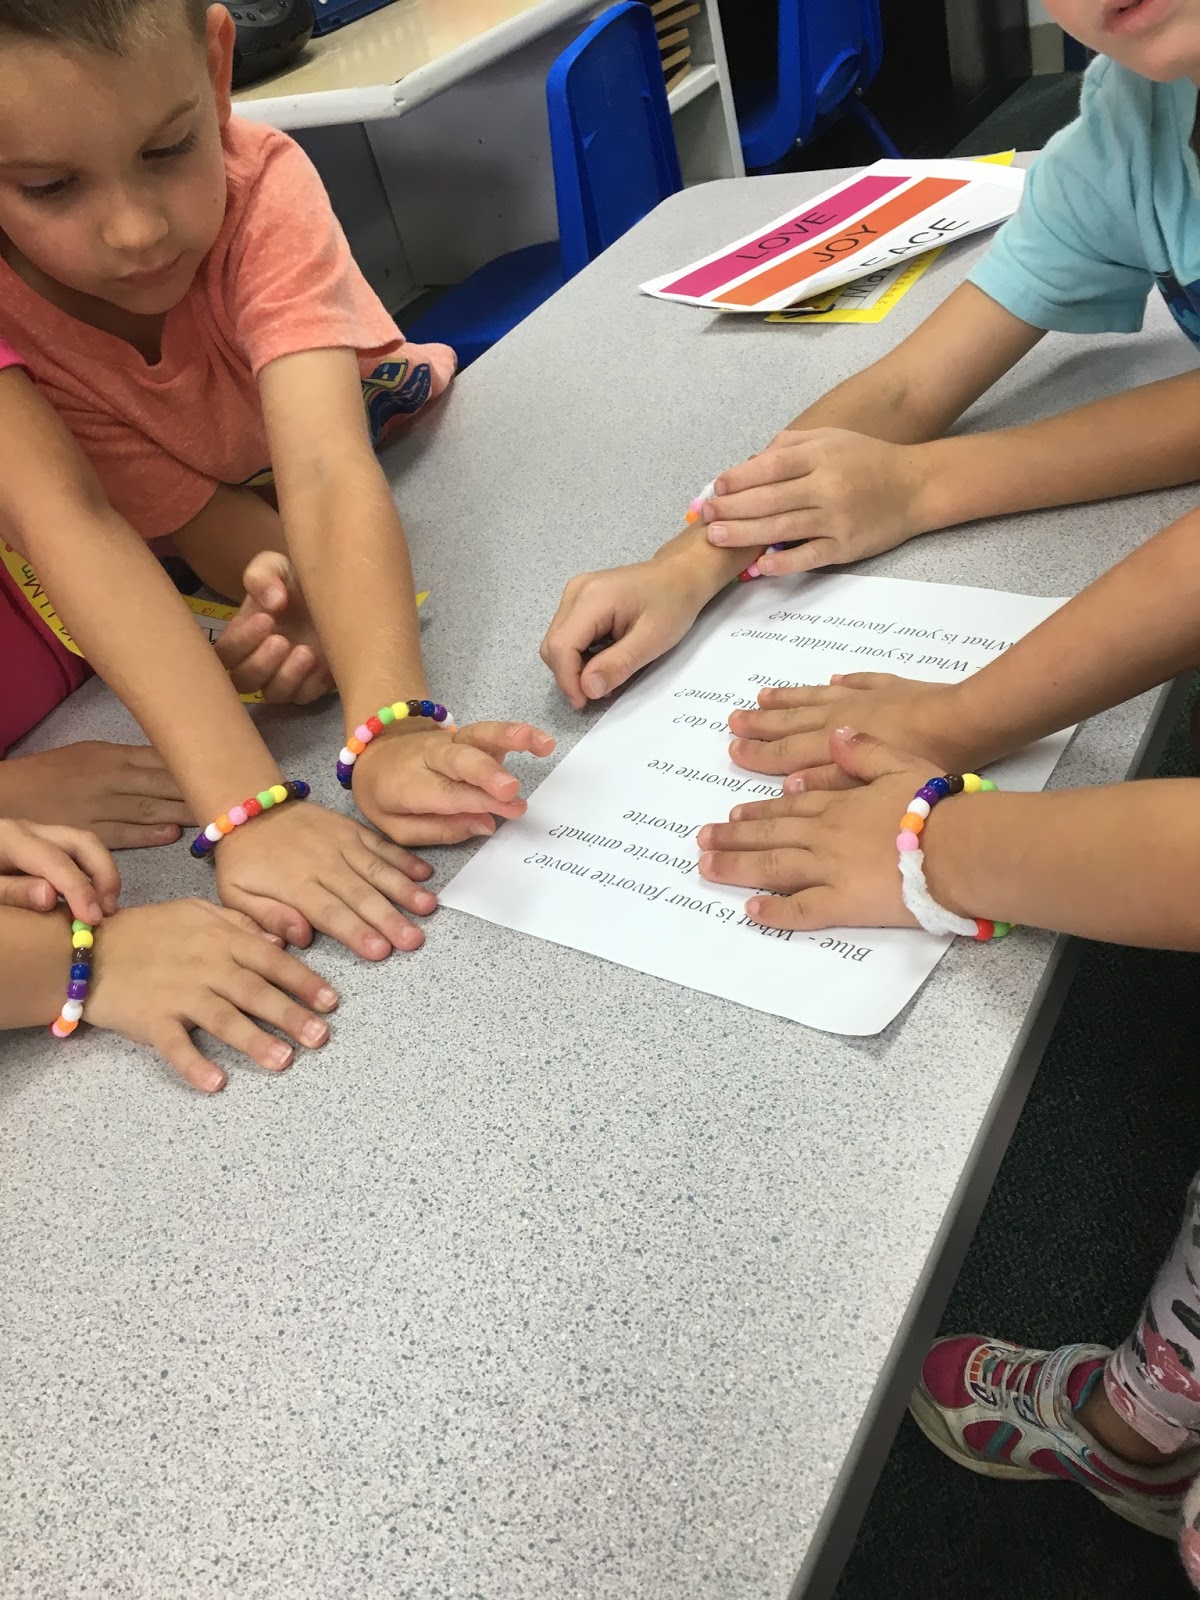
Pass out Puppeteer Sheet 1. Make students believe that you have not seen what is on the sheet. Instruct students to direct you to draw the sketch on the sheet. Show students how specific the instructions need to be.
  • The instructions must include quantity and specificity.
  • If a student says “draw a circle,” draw a tiny circle, or if a student says “draw a circle inside of a square,” make the square much larger than the circle to show that size is required.
  • If a student says “draw a circle and a square,” draw the shapes side-by-side, or if a student says “draw an arrow”, draw it far from the other objects, or at the wrong angle to show that position is required.
Then, pair students up and give one student in each group Puppeteer Sheet 2. This student is the puppeteer of the group. Instruct puppeteers to make sure their partner does not see the sketch on the sheet. Instruct puppeteers to direct their partner to draw the figure on the sheet.

First Activity with Dash & Dot - introduction

  • Teacher holds up the robots (starting with Dash)
  • Ask the students some questions - If we want to work with this robot, how do we get started? Once they mention that you have to turn it one, ask them for where they think the on/off switch is?
  • Turn on Dash
    • Notice that at this point the students can name Dash.
    • At this point Dash will make some noises. Students will automatically wonder where those sounds are coming from.
    • They will also notice that Dash will move his/her head and colors will be displayed. Use this opportunity to point out the different “features” of Dash (wheels, sensors, buttons, speaker, colors, etc)

Second Activity with Dash & Dot - “Go” App

  1. Display the app controls through the projector onto the board at the front of the room
  2. Look at the different “icons” and again ask the students what they think will happen.
  3. Once the class has gone through all of the sounds, then place the robot on the floor and experiment with the different options.
  4. Watching Dash move around will cause even more excitement for the students. Give different students a chance to pick different options to see what happens.

Third (and final activity) with Dash & Dot - “Path” App

(make sure that Dash is on the floor, or somewhere where he/she can’t get hurt)
  1. Teacher will display the “Path” App
  2. Start with the first App which is basically a grid. Hand the iPad to one of the students have them draw a line with their finger. Might want to start off with a simple straight line. Depending on the amount of floor space available will determine how much of a line you wish to have the student draw. (You can also leave it to trial and error, so that the students can see what happens when Dash runs out of room … runs into an obstacle)
  3. Ask the students what they think will happen.
  4. How much space is one square?
  5. Drag up the different sound effects to see what happens.
Basically this activity is all about exploring the app. Have the students try different things, ask them to think about what might happen, does what happen fit with their hypotheses (or expectations), if not, why not?

Recap written by Jessica Yandell:


This week, in one of the third grade classrooms I was able to introduce my good friends, Dash & Dot!  The focus of this lesson was to get the students thinking about coding programs, and introduce them to the apps and the robots.  I knew that the kids would be excited, so I decided to do their unplugged activity before introducing Dash & Dot.  This was a two part activity which was called puppeteer.  


The first part of the activity, the whole class was to act like a puppeteer, and tell me step by step how to perform a task. I gave each table a piece of paper to share with a picture of an object on it, and the goal was for everyone in the class to tell me how to draw the object using only verbal cues.  They had to be very specific in giving their directions in the proper order to ensure I drew the correct object.  Everyone was excited and engaged, and if I drew something wrong they say, “no, the line does not go vertically it is supposed to go diagonally through the object.”  The students were learning how important it is to follow a specific sequence of instructions to be successful, which is the basics to coding!


Next, I allowed the class to separate into groups of two, and do the same activity with a different picture. One partner drew the object, whereas the other member gave the drawing instructions, and made sure their partner did not see what the object looked like.  This was a fun exercise to start with, because it allowed collaboration and persistence to be successful!


The last part of the lesson was presenting my new “friends.”  I called two volunteers, which I let them uncover what was in my bag!  The whole class was excited!  We talked briefly about what robots are and things that they can do.  I wanted them to understand how our society uses them for many things, such as in the medical field, agriculture, etc.  We started running out of time, so I briefly showed the students that I used apps to write programs which tell the robots what to do.  Before the lesson, I had programmed Dash & Dot to perform and introduction for the students, where they said, “hello, nice to meet you,” and “ awe man, you’re making me blush!”  The kids loved it and were thrilled they would be able to use them for future projects!


(lesson adapted from makewonder.com)

Tuesday, August 23, 2016

Collaboration Contracts for Elementary Soft Skills


As this year has progressed, we have become more intentional at helping students grow the 21st-century skills of critical thinking, collaboration, communication, and creativity in the elementary schools. These are currently known as "soft skills" in education. According to dictionary.com a soft skill is "desirable qualities for certain forms of employment that do not depend on acquired knowledge: they include common sense, the ability to deal with people, and a positive flexible attitude." These soft skills will help students become future employees, managers, and business owners that have the ability to be team players, to see big pictures, and to adjust to adversity. 

So how are we preparing students to grow these skills? We are intentionally putting them in situations where they have to learn to work on them. As we dig into project-based learning opportunities and STEAM experiences it is rare that our students will be working alone or as a whole group. Small group learning is a major part of our endeavors. Our goal is to help students see what their strengths and weaknesses are as they work with others. 

Collaboration and communication will be key to these experiences being true learning opportunities. That being said, we have found that setting up scaffolding for disagreements has been an important part of this process. We created the following student contracts that allow students to decide how they will deal with dissension:

Student Contract
It is my team’s job to work well together and respect each other. If we have a disagreement on something, we will resolve the problem by:
Rolling dice. The team member with the highest number rolled gets to decide what happens next.
Flipping a coin. One team member calls “heads” or “tails” while another team member flips a penny. If the right word was called, the person gets to decide what happens next.
Drawing a card. One team member calls “red” or “black” while another team member draws one card.  If the right word was called, the person who called the correct color gets to decide what happens next.
Rock,Paper,Scissors. Scissors beat paper, Paper beats rock, Rock beats scissors.  The team member that wins one game gets to decide what happens next.
Taking Turns.   As a team, you choose to resolve conflict by taking turns.

We will not ask our teacher to resolve our differences unless we have tried to follow the procedures of this student contract.

We want our students to learn how to resolve issues by themselves so that we can guide the learning process and not just be putting out fires. Right now this is the only student contract we are using and we have actually scraped the idea for k-2 grade and are just letting them resolve by playing "rock, paper, scissors" because they can spend all day trying to decide how to resolve a conflict! (Yes, I see the humor in this). I am interested to see if this contract continues to meet our needs in 3-5th grade or if we will adapt based on the project at hand.

Creating ways for students to solve differences is important in helping them learn to value the ideas of others but also to remember that they have a right to be heard as well. We have students that fall on each side of the spectrum in regards to sharing. These contracts seem to help the pushy child to back off and the quiet child to be heard.

Friday, August 19, 2016

Tower of Babel: First Grade

Tower of Babel
Lesson Plan for Grade 1, Collaboration and Communication
Prepared by Julie Davis and Jessica Yandell

OVERVIEW & PURPOSE

Introduce STEAM to first graders by way of building towers with solo cups. The purpose of this lesson is to show students that they each have different ideas in their head and they have to work within teams to collaborate and communicate kindly and effectively to get the job done.

EDUCATION STANDARDS

  1. 21st century collaboration skills
  2. 21st century communication skills

OBJECTIVES

  1. Introduce student contract ideas.
  2. How to share responsibility in the engineering design process.
  3. Being respectful of our words
  4. Understanding the good of the team over their own viewpoint- how to compromise
  5. How to encourage others
  6. When you don’t do your part, it let’s the whole team down

MATERIALS NEEDED


  1. Video clip about the Tower of Babel http://viewpure.com/WFbmVxh9wmk?start=0&end=0
  2. Multiple red Solo cups
  3. 2 pictures of differing towers (see below)
  4. Two file folders
  5. Conflict resolution baggy that includes: dice, coin, card
  6. Student Contract (click here)
  7. VERIFICATION

    Steps to check for student understanding
    1. After towers are done recap with the following questions:
      1. Did your team work well together today?
        1. Why or why not?
      2. Did you both work on the tower?
      3. Did you listen to each other?
      4. Were your ideas listened to?
      5. Did your team ask for help when you needed it?
      6. Did you follow your student contract page?
      7. Did your team finish the day’s assignment to your satisfaction?
        1. Why? Why not?

    ACTIVITY

    Start activity with showing the movie clip about the Tower of Babel and talk about why being able to communicate with people you work with is an important part of getting jobs done. One word on the board: TOWER.  Students are told they have to build a model of what they saw with a partner.
    Use a wide open space. Students will sit on the floor with cups between them, facing a partner across the cups from them. Behind each line of students sits a file folder standing up on the end, hiding a picture of a tower. Both pictures will portray different towers on each side of the room. Students will go look at their prospective picture and come back and describe to their partner what they saw. Students don’t realize they are looking at two different pictures and they end up building a model that is a compromise of the two different ideas.


    (This lesson was adapted from STEM-Infusing the Elementary Classroom by Miranda Reagan)

Lesson recap written by Jessica Yandell:

First grade STEAM project recap

This week has been fun.  Another awesome STEAM project down in the books! The first project lesson of the year for our first graders was called Tower of Babel: Communication & Collaboration.  The focus of this project was teaching the students about the importance of good teamwork and communication.  


When I entered the room, I started by asking, “what is teamwork?”  Most of the kids responded by saying, “working together and sharing ideas.”  I was relieved to hear those responses, to me, that meant I had caught their attention that today's focus was all about collaboration!  I then shared a video with the class on the Tower of Babel, Genesis 11 (http://viewpure.com/WFbmVxh9wmk?start=0&end=0).  Talk about a great way to share the gospel with young children! The children were engaged, and excited.

Before starting the project, I asked the children what they learned from the story.  Many responded, “they were not able to talk to each other,” “they left, and didn’t build the tower.”  This is where I was able to bring it all together! I told the kids that in order to finish this project they are going to have to talk with each other and also be very good listeners to one another, or else they will have a hard time working together.  

During the project, most of the students referred back to their student contract, which is playing a game of rock paper scissors to resolve their conflicting ideas.  It was hard for the groups to agree on how to build the tower, because each partner was shown a different picture of how the towers should look.  I took the opportunity to walk around to each group and watch their interactions and listen how they managed conflict.

I wrapped up the project by asking the students reflection question, such as, “did your group work well together,” and “did your tower turn out the way you wanted,” and “how did your group resolve conflict?”  I had many groups tell me that the project was hard because they had different ideas, but  they worked well together because they were able to put their ideas together to make a great tower.  After the class reflection I was able to share with the class, that each partner was shown a different picture of how the tower should look, which meant they had different ideas in their heads. I closed by reinforcing that good teamwork means sharing ideas, being good listeners, and having fun!