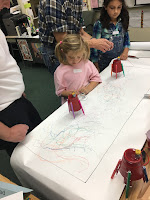
 Several weeks ago we had our first ever "Family STEAM Night" at CCS Lower School. It was a delightful night but not without some troubleshooting needs. During the day I decided to create examples for all of the different stations and had some issues in making the lesson below work. I loved the concept so I handed it off to one of our teachers and he problem solved to make the idea work.
What really caught my attention was the critical thinking and problem solving that went on at the rotation itself. It was true scientific method/ problem solving at it's finest! Read what Mr. Lubben said afterwards (directions for the station follow):
"The 'Color Bot' table in Mrs. Tallent's room last Monday's STEAM Night was a work in progress. The kids who chose this activity used printed instructions to create electric-powered vibrating plastic party cups with uncapped art markers as legs. They improvised, however, by cutting away parts of the cups, gluing the pens instead of the cups, and most importantly, as we observed, hand-holding the 9 volt batteries instead of having them go for the ride the tiny electric motors provided. It made the cups lighter and allowed them to dance and twirl across the glossy paper creating spirals and zigzags of color. The magic of it all was that the kids made changes on their own and observed the difference between various test models. It was true science and art in action!"
Motorized Coloring Machine
Parent help required!

Supplies You Will Need:
- motor with attached wiring
- electric drill and screw
- Use a red plastic cup, and have one of the parents drill a hole into the bottom of the cup using a screw. (Be careful not to apply to much pressure, as the cup might crack if you do that. Slow and steady.)
- Insert the motor and it’s attached wires into the hole you created in the bottom of the cup.
- Use a hot glue gun to secure it into place.
- Hot glue the 9 volt battery to the cup. We just glued it down right next to the motor.
- Add an alligator clip to the wires. This alligator clip will be used as a connector for the motor to the battery.
- You can also glue down the wires to the side of the cup if there is a lot of wire hanging and you want to keep it out of the way. This is what we did.
- Hot glue the markers onto the side of the cup.
- When you’re ready to color, go to the big sheet of white paper.
- Then remove the lids from the markers and connect the battery and motor and watch it go, go, go!
- It will vibrate, jump around a bit and go in circles, coloring all the while.
- We will use these papers on the float as part of the decorations!

No comments:
Post a Comment